Raspberry pi Infrared Receiver
read
HELP SUPPORT MY WORK: If you're feeling flush then please stop by Patreon Or you can make a one off donation via ko-fi
To get my infrared receiver working with my Raspberry Pi I followed the great instructions provided here.
First we need to wire up our IR sensor.
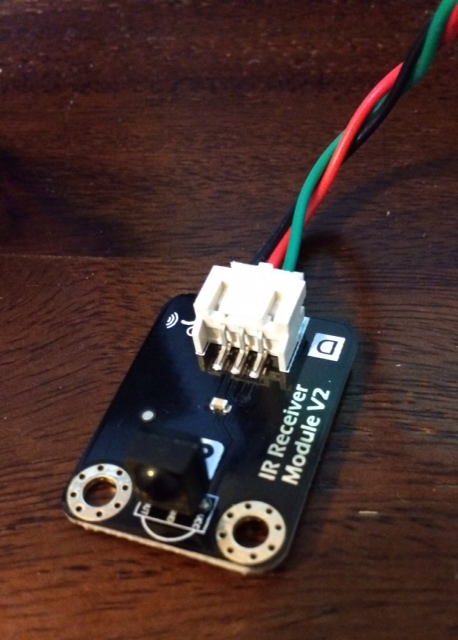
You can find a description of the pins here.
- Pin 1 is the output so we wire this to a visible LED and resistor
- Pin 2 is ground
- Pin 3 is VCC, connect to 3.3V
And then we need to set up LIRC (Linux Infrared Remote Control)
sudo apt-get install lirc
And then add this to your /etc/modules file:
lirc_dev
lirc_rpi gpio_in_pin=18 gpio_out_pin=22
Now modify /etc/lirc/hardware.conf
To match the contents shown below (more details available here and here)
########################################################
# /etc/lirc/hardware.conf
#
# Arguments which will be used when launching lircd
LIRCD_ARGS="--uinput"

# Don't start lircmd even if there seems to be a good config file
# START_LIRCMD=false

# Don't start irexec, even if a good config file seems to exist.
# START_IREXEC=false

# Try to load appropriate kernel modules
LOAD_MODULES=true

# Run "lircd --driver=help" for a list of supported drivers.
DRIVER="default"
# usually /dev/lirc0 is the correct setting for systems using udev
DEVICE="/dev/lirc0"
MODULES="lirc_rpi"

# Default configuration files for your hardware if any
LIRCD_CONF=""
LIRCMD_CONF=""
########################################################
And reboot your Pi.
You can now test that you’ve wired everything up correctly by typing:
sudo /etc/init.d/lirc stop
mode2 -d /dev/lirc0
When you point a remote control at your receiver you should see:
space 3020711
pulse 9126
space 4512
pulse 582
space 559
pulse 553
space 590
pulse 581
space 593
pulse 534
space 548
pulse 586
space 579
pulse 542
space 556
pulse 614
space 533
pulse 551
space 589
pulse 590
...
You can now create or download a lirc config file for your remote. To do this I followed the instructions in the lined blog.
# Stop lirc to free up /dev/lirc0
sudo /etc/init.d/lirc stop

# Create a new remote control configuration file (using /dev/lirc0) and save the output to ~/lircd.conf
irrecord -d /dev/lirc0 ~/lircd.conf

# Make a backup of the original lircd.conf file
sudo mv /etc/lirc/lircd.conf /etc/lirc/lircd_original.conf

# Copy over your new configuration file
sudo cp ~/lircd.conf /etc/lirc/lircd.conf

# Start up lirc again
sudo /etc/init.d/lirc start
You can test that things are working by doing:
Related Posts
Raspberry Pi BTLE Device - Just wrapped up the first iOSCon hackathon and had a blast tinkering with my Raspberry Pi, turning it into a full-fledged Bluetooth device in sync with an iPhone app. Used node for setting up and Bleno for creating Bluetooth low energy peripherals. Penned down each step for you to replicate, right from writing strings on my LCD to reading temperatures and getting notified of IR remote button clicks. Ran it on an app store or GitHub test application. Also, explored the Core Bluetooth framework for iOS app creation, for reading and writing data to the Raspberry Pi. Let's keep creating magic with technology!
Raspberry Pi iBeacon - In today's blog post, I successfully turned my Raspberry Pi into an iBeacon using a Bluetooth dongle and following an Adafruit tutorial. I had to go under the hood a bit to make sure my dongle was recognized, but after adding some udev rules, it was good to go. Then, with a string of terminal commands, I was able to set it up as an iBeacon broadcasting a specific UUID. Testing it out with a basic iOS app, I was able to detect the signal strength from the beacon! While it wasn't the flashiest project, it was definitely satisfying to see it work.
Raspberry Pi temperature sensor - In just a bit of time, I managed to successfully get my temperature sensor, the DS18B20, up and running on my new Raspberry Pi. My starter kit even included a ready made circuit board for the sensor, making wiring a no-brainer. After following the setup instructions and inputting a few commands, voilà, my temperature readouts were coming in loud and clear. Ready to tinker around and perhaps even move the connection pin if needed.
Forget SSH and vim, Use VSCode to Remote Develop on the Raspberry Pi - In this blog post, I share how you can avoid hassles of SSH and use VSCode for remotely developing on the Raspberry Pi. I walk through how to initially configure the Pi in a headless setup using the Pi imager app. Then, we install the 'Remote Development' extension in VSCode. I illustrate how easy it is to connect to the Pi using our SSH credentials, clone a GitHub project, and install python extensions. Finally, I explore how to run the code and debug it. However, note that the method doesn't support armv6, so you can't use it on Pi Zero.
75% Less Power! - Saving the Planet With Motion Sensing and Image Processing - In this blog, I was dealing with a conundrum on how to reduce the power consumption of my cool magic mirror that was always on, always drawing power. I considered options such as a PIR (Passive Infra Red) sensor and a doppler radar microwave motion sensor. The latter worked brilliantly except for a few too many false positives. Things got technologically fancy when I introduced a camera for motion detection and face recognition, even recognizing who is in front of the mirror! However, while it was fascinating, it upped the power consumption which was against our original goal. After combining everything into an impressive package and even forming simple state machine, I found that the sophisticated system needed more work. Conditions like lighting and screen turn-on time presented challenges. However, it did make a significant difference - nearly running at 25% of the original power consumption. Definitely a promising and interesting project worth looking into further!
Related Videos
A Smarter Magic Mirror - Raspberry Pi Face Recognition and Doppler Radar Motion Detection - Learn how to enhance a magic mirror with motion sensors, face detection, and face recognition using PIR sensors, radar sensors, and image processing on a Raspberry Pi.
Reviving a Broken iPad: Transforming it into a Magic Mirror with Raspberry Pi Zero - Learn how to transform an old iPad 1 screen and a Raspberry Pi Zero into a Magic Mirror with this step-by-step guide! Enhance your home with this unique, DIY upgrade.
Getting started with Raspberry Pi Pico - MicroPython - Learn how to get started with Raspberry Pi Pico by soldering headers, writing codes, and building a classic blinking LED project in this tutorial.
Most Interesting Addressable LEDs that I've Ever Seen - So, I got this nifty 2x2 meter 400 LED curtain and immediately went to work dismantling it. The LED strands are tapped off the main wire, rather than daisy-chained, which is a departure from the norm. Turns out, these LEDs are pre-programmed, allowing them to intelligently latch onto the right serial data. Unraveling the control unit, we see an IR receiver and other key components responsible for driving the LED strings. Despite my misgivings about deciphering in-built Bluetooth characteristics, I hooked the circuit back up with our dependable WLED software and got some amazing grid patterns. Interestingly, the LEDs operated smoothly at 3.3V. All in all, a fun exploration of hacking this LED curtain.
Streaming Video and Audio over WiFi with the ESP32 - In this video, we dive into a hardware hack combining several components to create my version of the TinyTV, complete with a remote control, and video streaming over Wi-Fi. We challenge the speed of image display, using different libraries and tweaking performance for optimal results. We explore Motion JPEG or MJPEG to decode and draw images quickly, and even reach about 28 frames per second. We also catered audio using 8-bit PCM data at 16kHz, and deal with syncing both video and audio streams. Finally, we add some interactive elements allowing us to change channels and control volumes, with a classic static animation thrown in for good measure. There's a few hiccups along the way, but that's part of the fun, right?
HELP SUPPORT MY WORK: If you're feeling flush then please stop by Patreon Or you can make a one off donation via ko-fi