View All Posts
read
Want to keep up to date with the latest posts and videos? Subscribe to the newsletter
HELP SUPPORT MY WORK: If you're feeling flush then please stop by Patreon Or you can make a one off donation via ko-fi
#BINARY CLASSIFICATION #MACHINE LEARNING #PYTHON GENERATOR #TENSORFLOW

Binary classification is used where you have data that falls into two possible classes - a classic example would be “hotdog” or “not hotdog” ((if you don’t get the hot dog reference then watch this).

If you’re looking to categorise your input into more than 2 categories then checkout TensorFlow Categorical Classification

You can find the example notebook(s) for this post in the tensorflow-tutorial GitHub repo.

For this small tutorial, I’ve created a python generator that creates images with either a square or a circle.

Training Images

def data_generator():
    i = 0
    while(True):
        if i >= 1000:
            i = 0
        # our output value will be 0 or 1
        Y = i % 2
        X = np.zeros((image_width, image_height, 1))

        # size of our shape
        radius = int(np.random.uniform(10,20))
        # position of our shape
        center_x = int(np.random.uniform(radius, image_width - radius))
        center_y = int(np.random.uniform(radius, image_height - radius))

        if Y == 0: # generate a square
            X[center_y - radius:center_y + radius, center_x - radius:center_x + radius] = 1
        else: # generate a circle
            for y in range(-radius, radius):
                for x in range(-radius, radius):
                    if x*x + y*y <= radius*radius:
                        X[y+center_y, x+center_x] = 1
        yield X, [Y]
        i = i + 1

Our simple generator will generate an infinite number of samples, alternating between a random square and random circle.

To get binary classification working we need to take note of a couple of things:

  1. We need to have one output neuron with a sigmoid activation function. The sigmoid activation function will return a value between 0 and 1 - we’ll use this to determine how confident the network is that input falls the true class.
  2. We need to use the BinaryCrossentropy loss function during our training.

Our simple model looks like this:

model = Sequential([
    Conv2D(8, 3,
           padding='same',
           activation='relu',
           input_shape=(image_width, image_height, 1),
           name='conv_layer'),
    MaxPooling2D(name='max_pooling'),
    Flatten(),
    Dense(
        10,
        activation='relu',
        name='hidden_layer'
    ),
    Dense(1, activation='sigmoid', name='output')
])

And when we compile it we specify the loss function that we want to optimise:

model.compile(optimizer='adam',
              loss=tf.keras.losses.BinaryCrossentropy(),
              metrics=['accuracy'])

Given our simple problem (is it a square or a triangle) you should be able to get close to 100% accuracy with just a few training epochs.

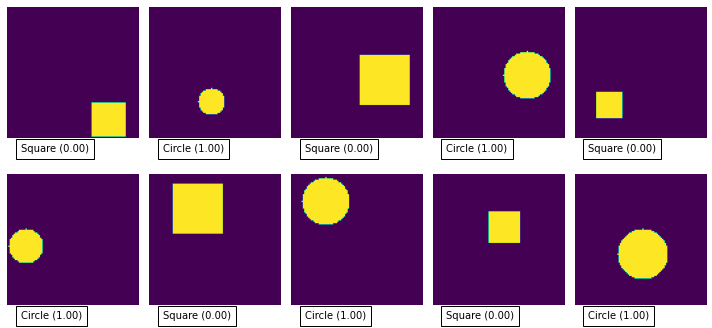
You can test the model pretty easily by feeding in some more random samples from the training set:

# get a batch of samples from the dataset
X, Y = next(iter(train_dataset))
# ask the model to predict the output for our samples
predicted_Y = model.predict(X.numpy())
# show the images along with the predicted value
plot_images(X, predicted_Y)

Trained

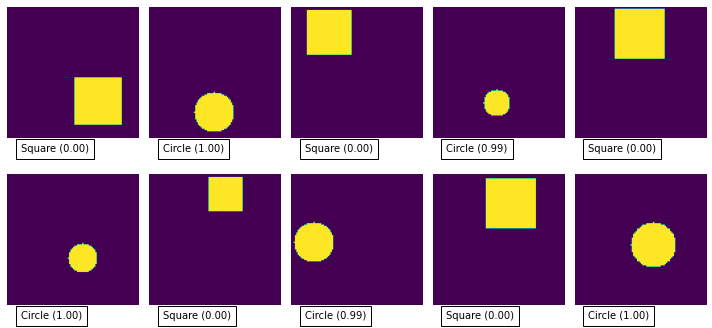
As you can see it is pretty good at classifying the images, mostly producing 0 or 1 for each image.

Checkout the full code in the GitHub repo.

#BINARY CLASSIFICATION #MACHINE LEARNING #PYTHON GENERATOR #TENSORFLOW

Related Posts

TensorFlow Categorical Classification - In this blog, I venture beyond binary classification and delve into categorical classification using TensorFlow. Specifically, I show how to generate and classify images into four categories: blank, square, circle, and triangle. Crucially, I highlight the use of one-hot encoding for labeling and the softmax activation function in our model. I provide examples of code, results of my model's predictions, and link to the full code in my GitHub repository. Feel free to try it out and explore this exciting domain of machine learning further.
How does it all work? - In this blog, I explain the process behind my Sudoku Grab app, a solution that uses basic image processing techniques to recognize Sudoku puzzles. This is done by locating the puzzle in an image, turning it back into a square form, segmenting it to find potential numbers, and lastly, recognizing those numbers. This involves simple thresholding techniques, blob extraction algorithm, perspective transform, and a Neural Network for Optical Character Recognition (OCR) to recognize digits from the photograph. I conclude by mentioning the potential for multiple enhancements to this process.

Related Videos

TensorFlow Lite With Platform.io and the ESP32 - Learn how to train a simple TensorFlow Lite model and run it on the ESP32 using PlatformIO! With clear instructions and a helpful video, this tutorial will have your project up and running in no time.
Build Your Own Voice-Controlled Robot with ESP32 & TensorFlow Lite - Learn how to create a voice-controlled robot using ESP32 and TensorFlow Lite with this step-by-step guide on creating neural networks, generating training data, and implementing firmware codes.
AR Sudoku Solver in Your Browser: TensorFlow & Image Processing Magic - Discover how to recreate a Sudoku app using browser APIs and ecosystem advancements, and explore the image processing pipeline technique for extracting Sudoku puzzles and solving them.
Vision framework and CoreML - Discover the seamless integration of Apple's Vision framework with Core ML for object identification in this astounding demonstration, and lock onto the project at GitHub.
256 Shades of Grey – Adventures in Image Processing - In this enlightening video, I delve into the deep and fascinating world of image processing. Forget everything you thought you knew about pixels – they’re not squares or rectangles and they definitely aren’t discs. All pixels are, my friends, are point samples, each capturing brightness or color at a particular position. Curious to know how to manipulate them? I also unravel this mysterious tapestry, familiarizing you with the technicalities of grayscale, RGB, HSB, YUV, and a fleeting mention of CMYK. And if you think that's all, hold tight! Did you know we could apply Fourier transforms, akin to graphic equalisers used in audio, to our good old two-dimensional images? Strap in as I guide you through this potentially overwhelming realm with a pinch of humor, lots of simplicity, and oodles of practical examples.
HELP SUPPORT MY WORK: If you're feeling flush then please stop by Patreon Or you can make a one off donation via ko-fi
Want to keep up to date with the latest posts and videos? Subscribe to the newsletter
Blog Logo

Chris Greening


Published

> Image

atomic14

A collection of slightly mad projects, instructive/educational videos, and generally interesting stuff. Building projects around the Arduino and ESP32 platforms - we'll be exploring AI, Computer Vision, Audio, 3D Printing - it may get a bit eclectic...

View All Posts