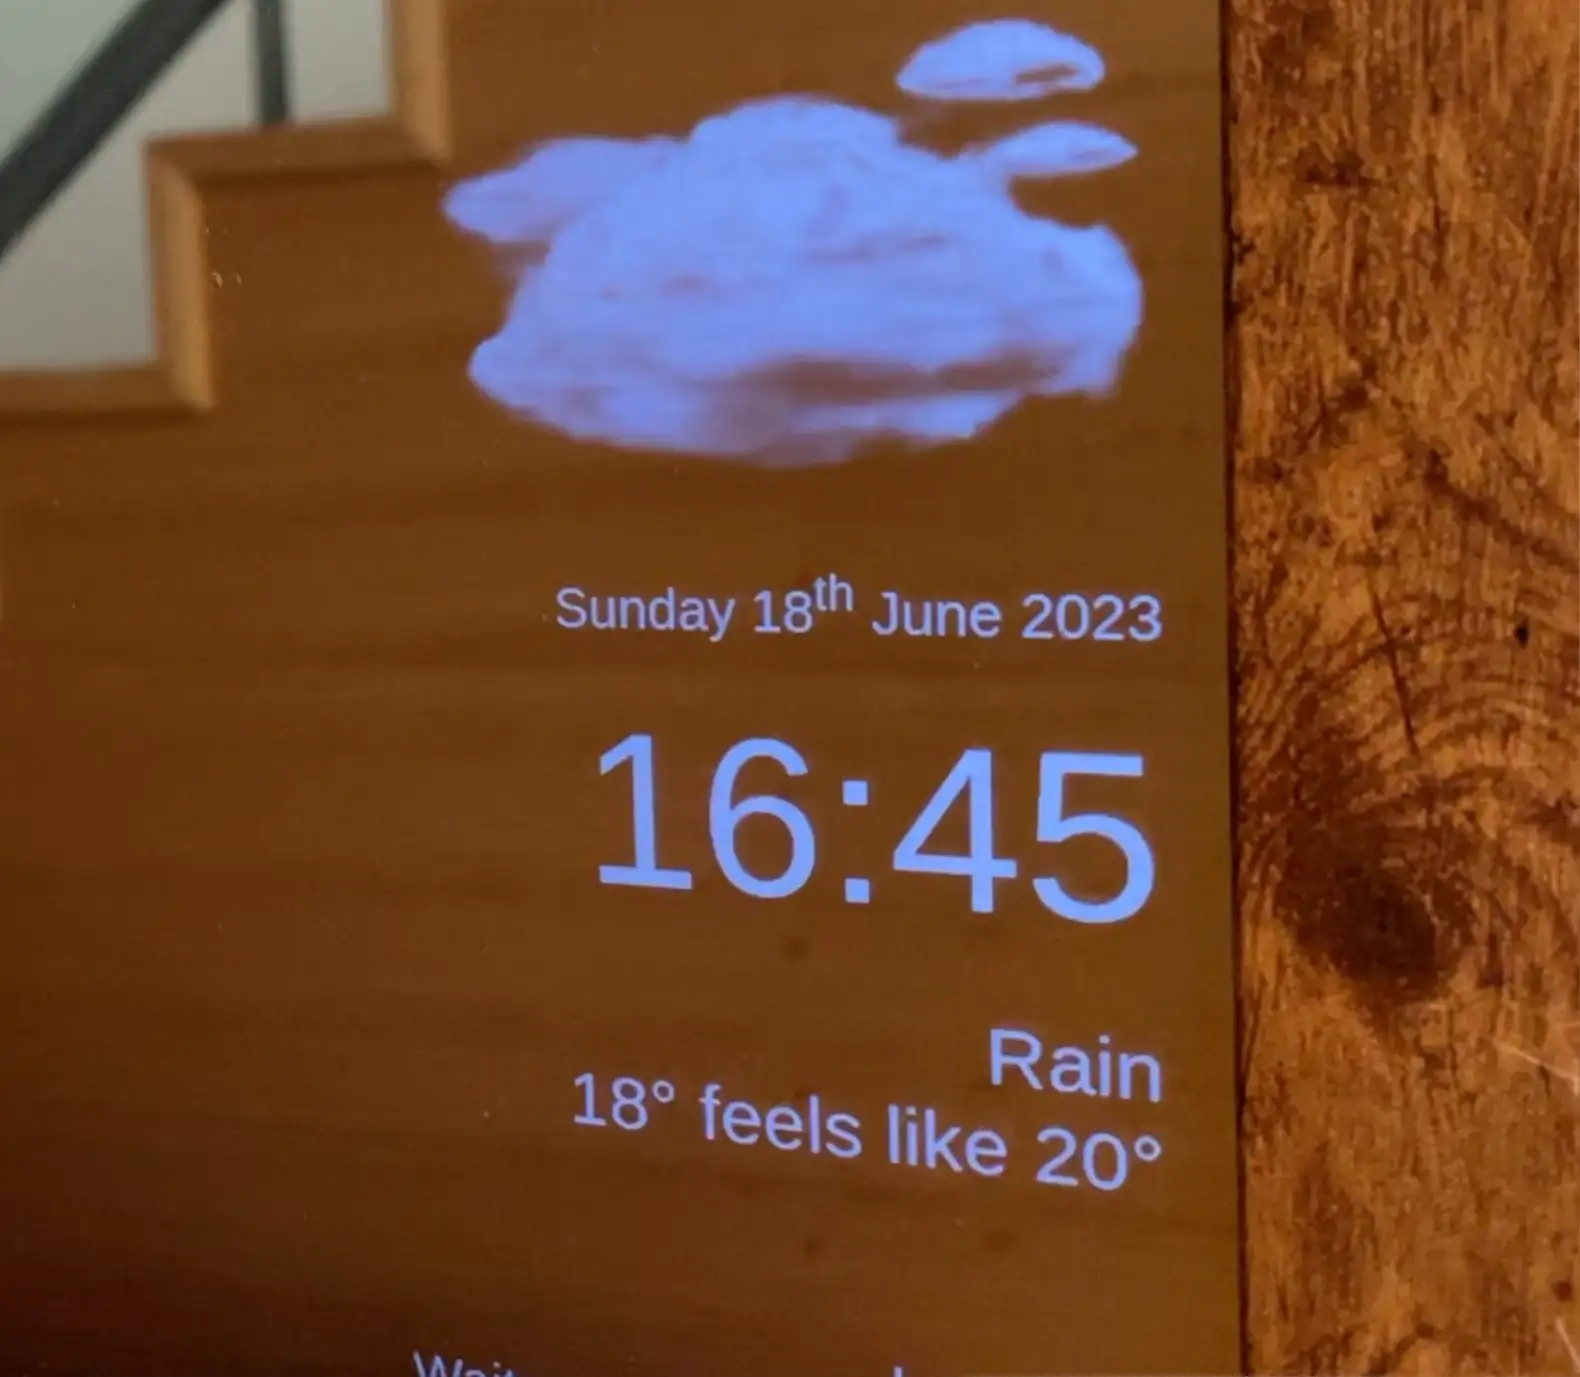
If you follow the YouTube channel or the blog you’ll know that I’ve got a magic mirror. It’s really nice and it’s very handy to be able to get a quick snapshot of things at a glance.
But there’s a big problem with it.
There’s nothing wrong with it functionally - it does everything I need.
If you want to watch the video version of this post, you can find it here.
What’s the problem?
The problem I have is that it is always on and always drawing maximum power. I measured the power consumption and was surprised at just how much power it was using - around 600mA.
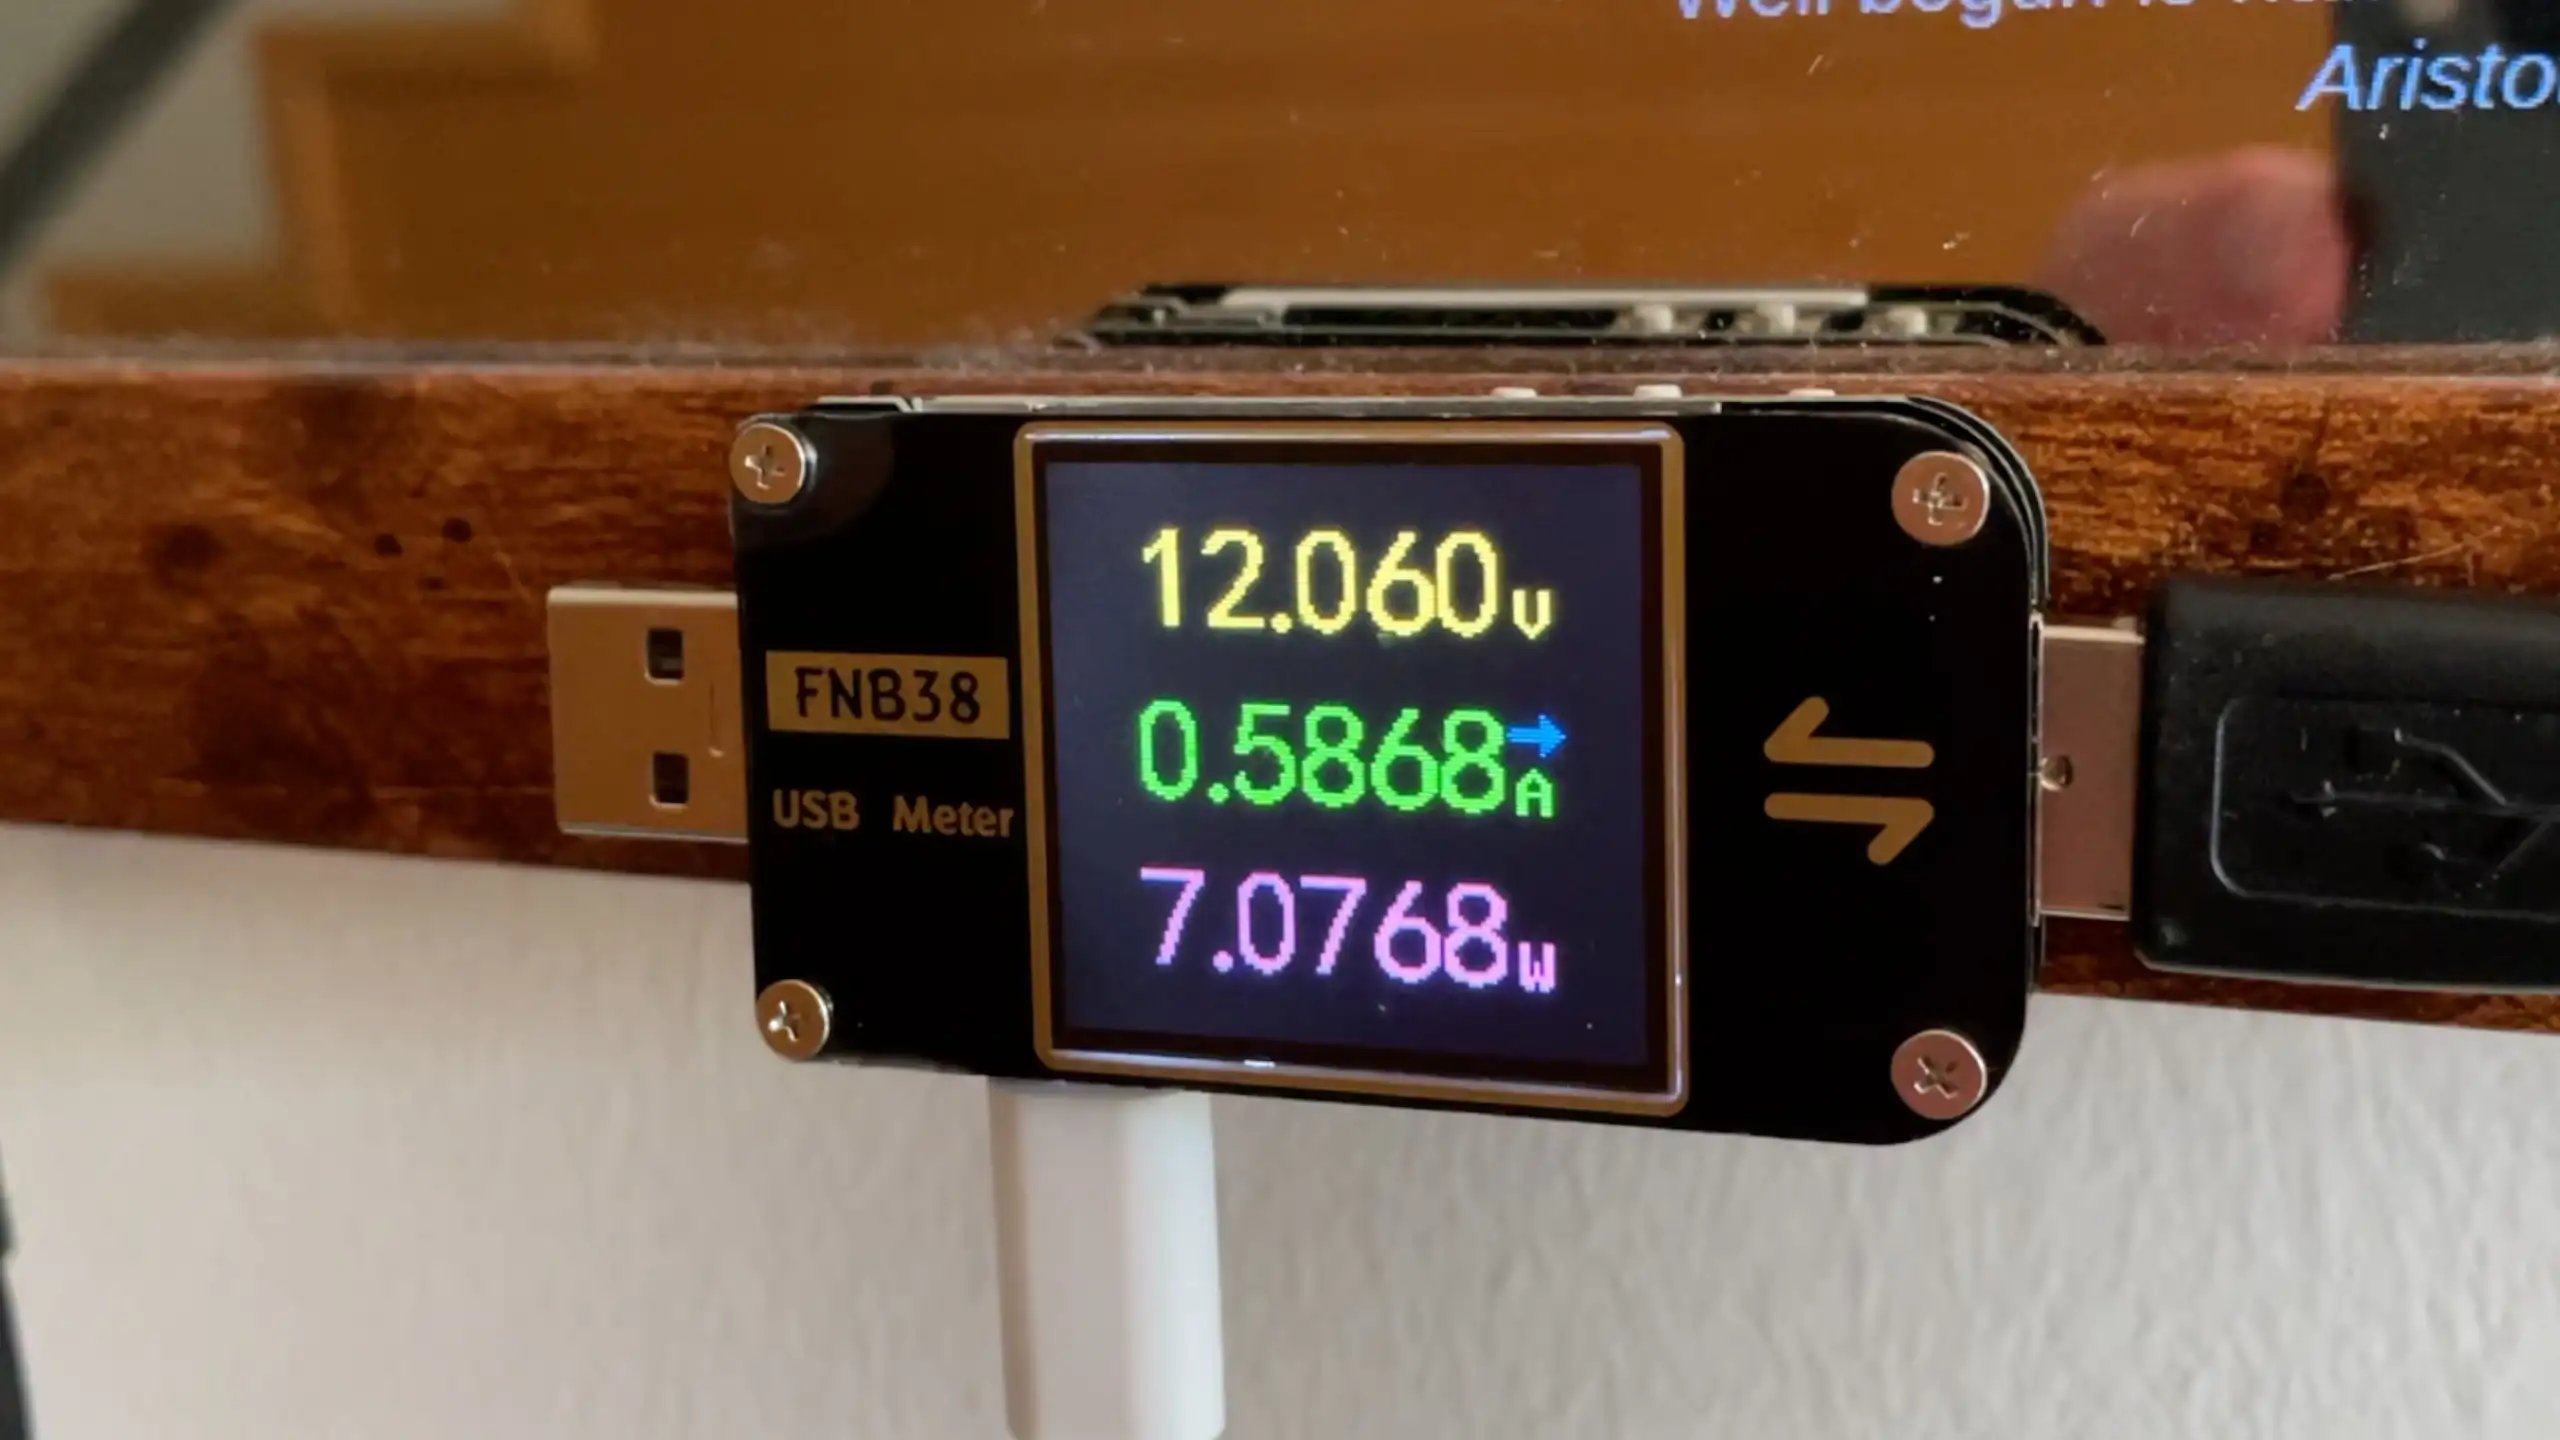
These USB power monitors are really handy and you can trigger things like Power Delivery and Quick Charge to get different voltages for all sorts of things.
600mA may not sound like a lot, but it all adds up, and have you seen the cost of electricity recently?
What can we do?
If this was a desktop or a laptop then we’d just have it turn off the screen after a period of inactivity. Pretty simple when you have a mouse or keyboard. But a magic mirror with a mouse and keyboard would look pretty silly.
We could add a button, we could even try and get clever and add a capacitive touch sensor, maybe in the frame or behind the glass.
But then we’d end up with mucky fingerprints all over the mirror and it kind of defeats the whole point of having a magic mirror in the first place. I might as well just use my phone.
What we really want to do, is to only have the screen turn on if someone is actually in front of the mirror.
How about a motion sensor?
The obvious solution is to just use a motion sensor. We’ve got a couple of options:
Passive Infra Red (PIR) Motion Sensor
Let’s start with the old classic Passive Infra Red (PIR) motion sensor.
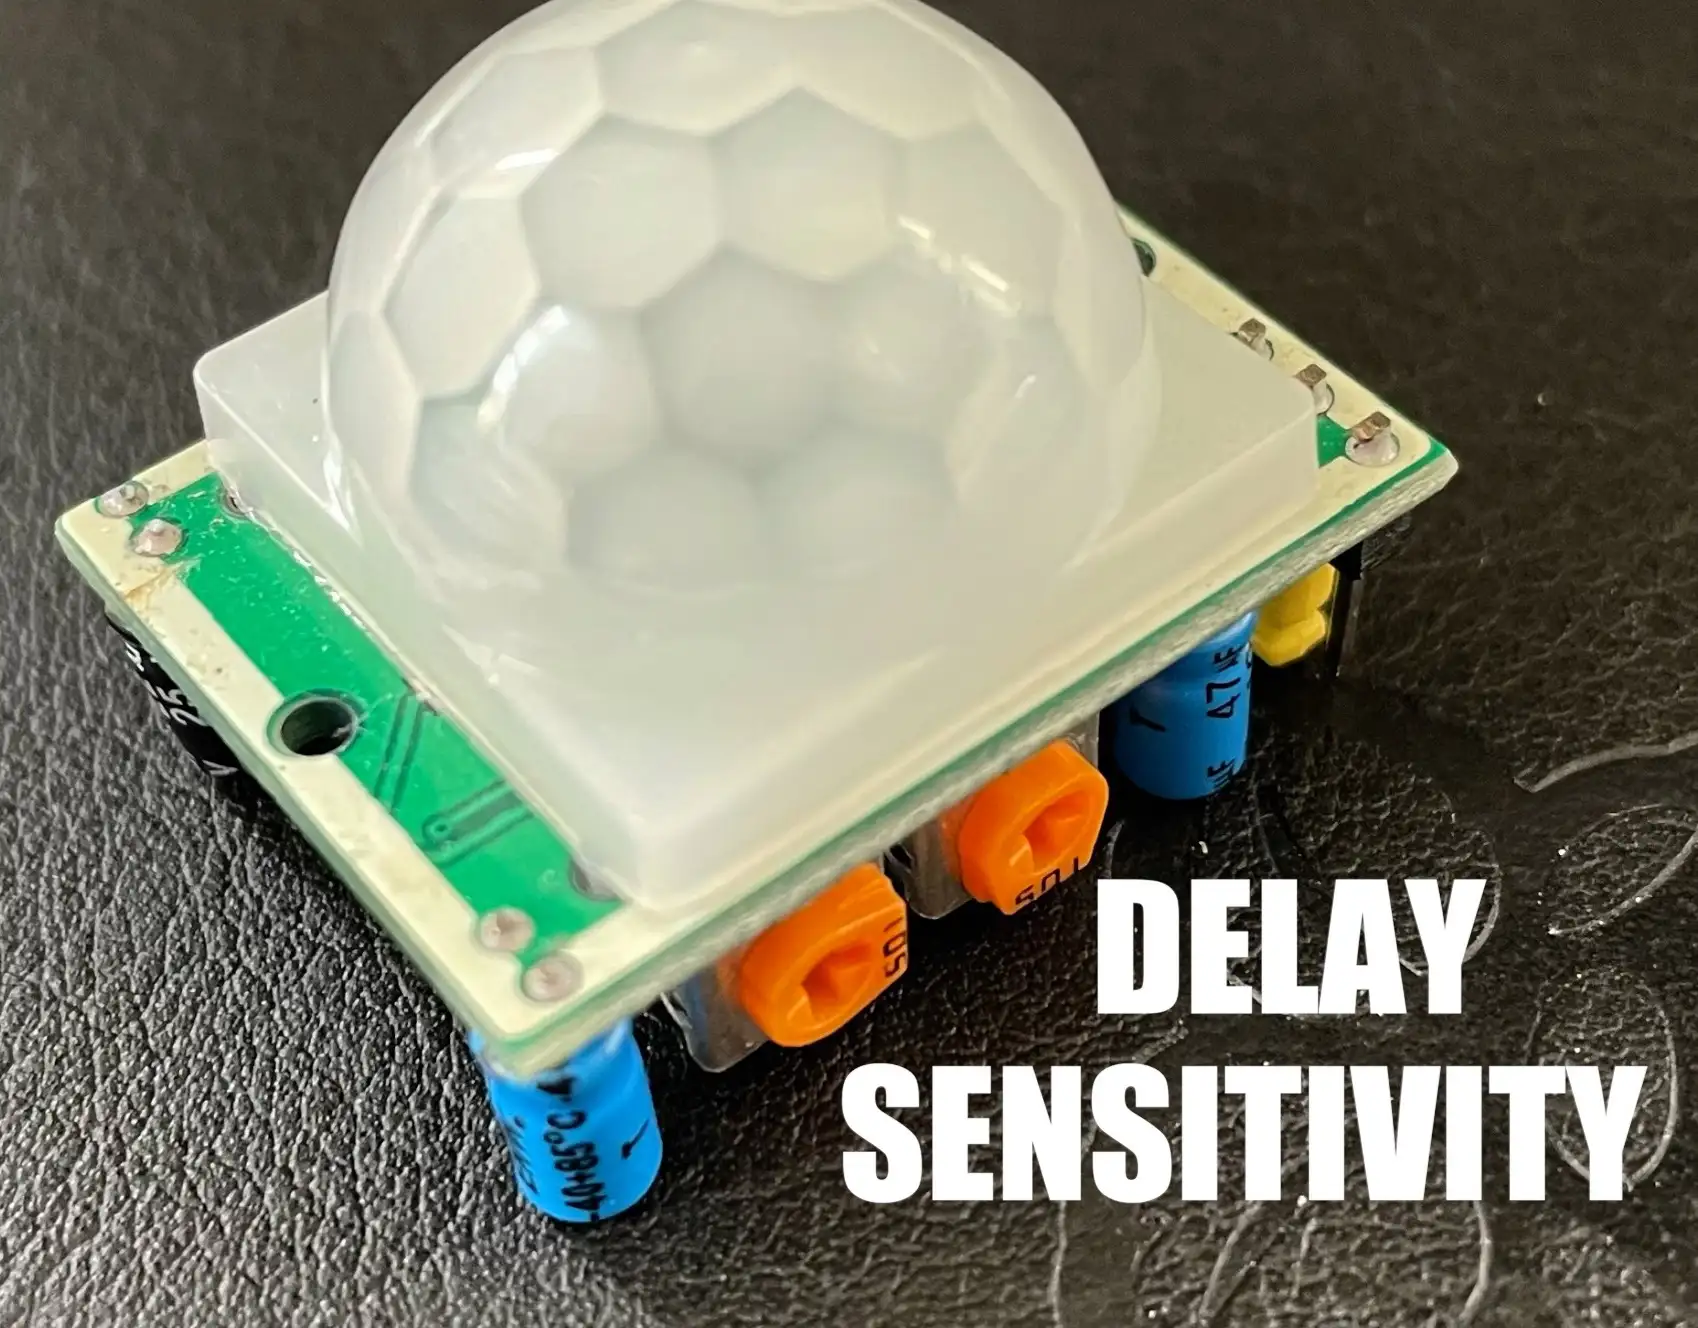
These are readily available and are dead easy to hook up - there are only three pins to worry about. Power, Ground and the output pin.
The power pin can take anything from 4.5 to 12 volts - so that’s easy enough we can just take 5V directly from the Pi.
The output pin goes high if movement is detected, so that’s also very simple.
There are a couple of potentiometers for tuning the behaviour, one of them adjusts the sensitivity and the other adjusts how long the output pin stays high when motion is detected.
The only slightly confusing option is this jumper. This switches the board between Retrigger or Normal mode.
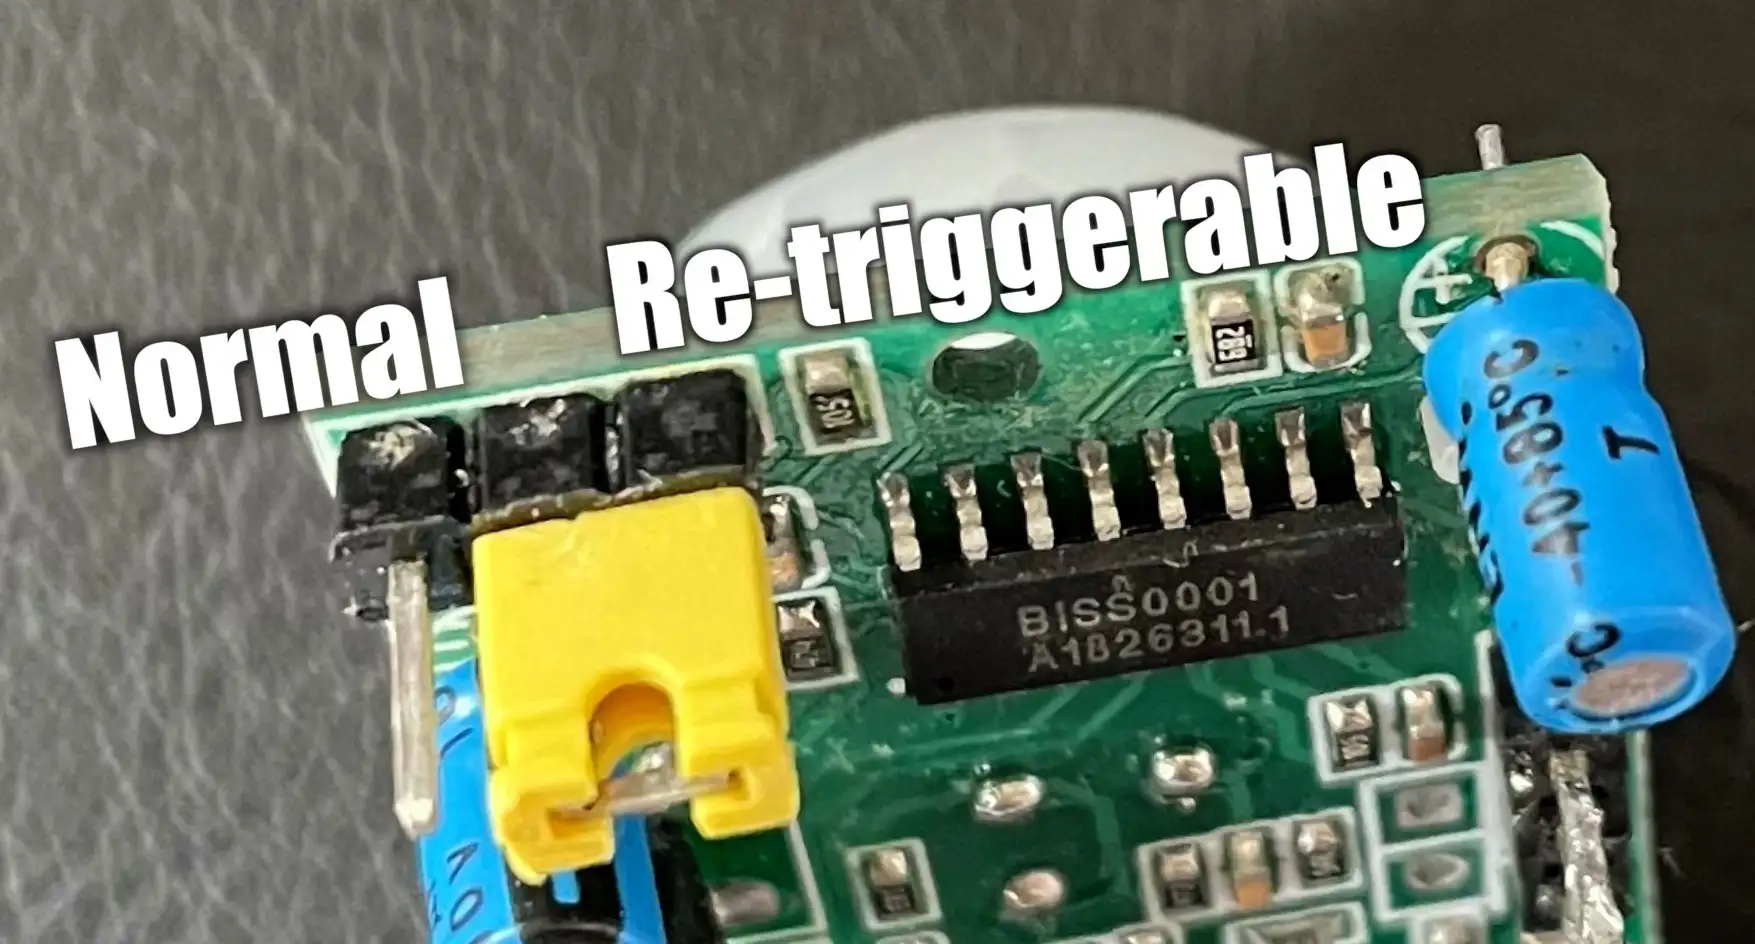
In retrigger mode, the pin goes high when motion is detected and will go low after the delay from the time the last motion was detected. Basically, the pin will stay high for as long as something is moving.
In Normal mode, the output will trigger every second or so when there is motion.
You’ll typically be wanting to use Retrigger mode as this behaves in the way that most people would expect.
The only thing that you might be wondering is how we’re going to connect this up to the Pi’s GPIO pins - we’re powering it from a 5V supply and the Pi’s GPIO can only take 3.3V.
Fortunately, these boards have a cheeky 3.3V regulator built in - so they are actually running at a 3.3V logic level already. So it’s perfectly safe to connect the output pin straight to the Pi.
The problem I have with the module is that it’s pretty thick. If we stick this behind the mirror it’s going to stick out from the wall. I’m also not even sure that it will work through the mirror - the mirror may block any infrared light. And if we put it outside of the mirror it’s going to look pretty ugly.
Doppler Radar Microwave Motion Sensor
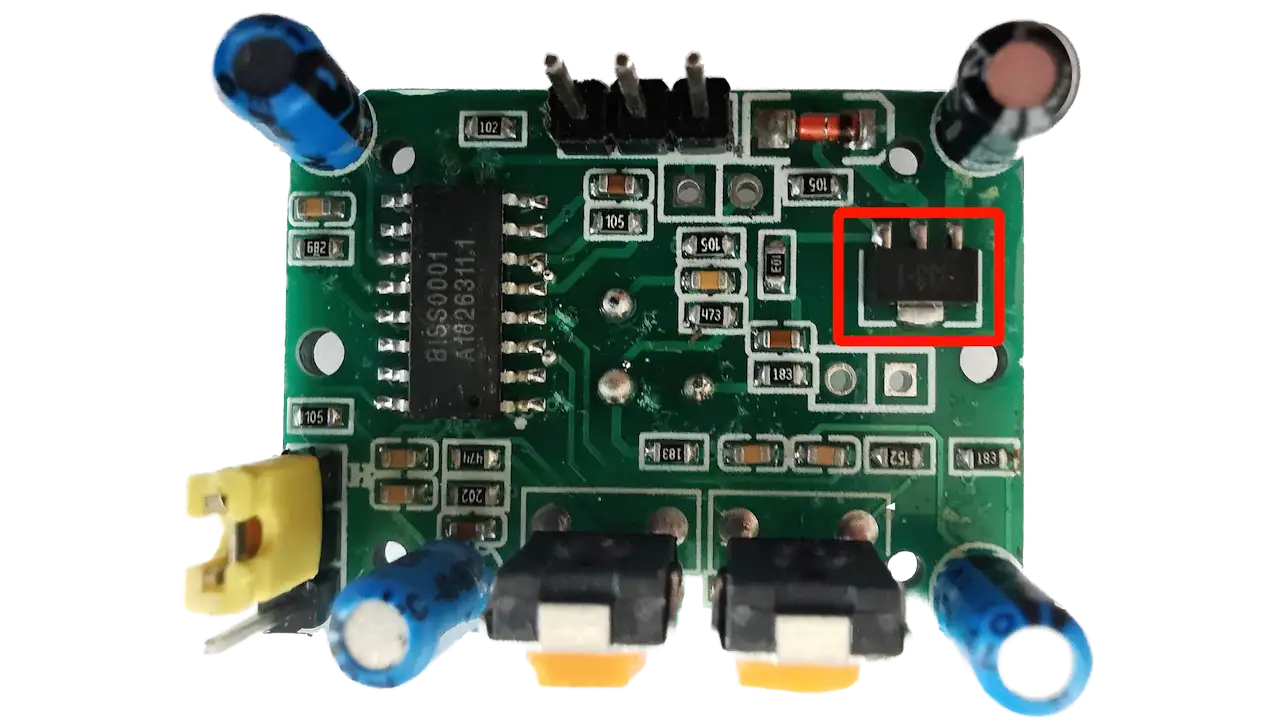
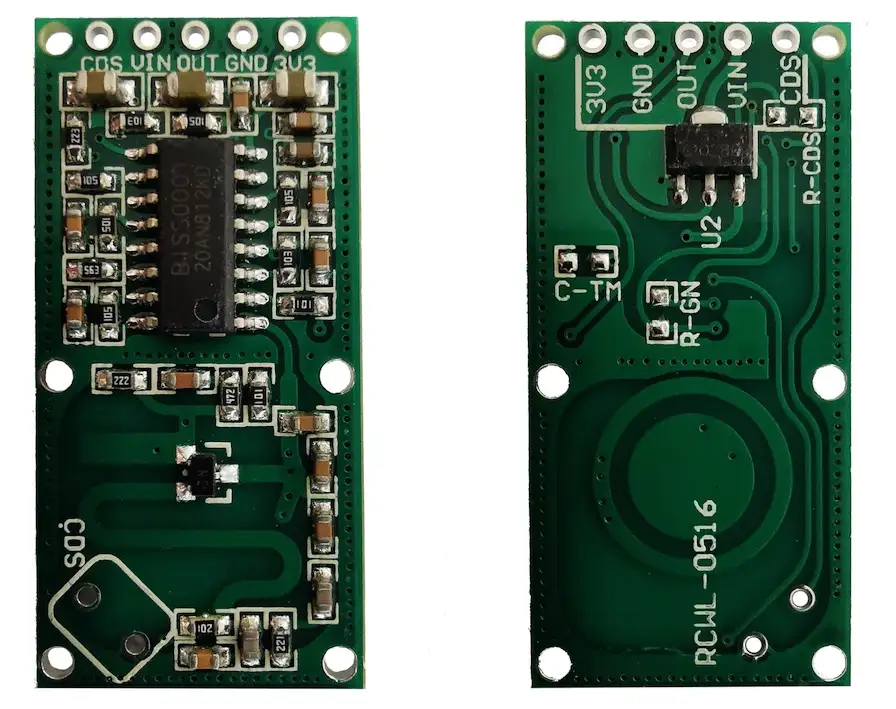
So, let’s have a look at something slightly more modern - I’ve had this doppler radar microwave motion sensor module lying around for ages.
These are pretty interesting devices, and if you look carefully you can see that they actually use exactly the same chip as the PIR sensor - a BISS0001. There’s some debate about whether these sensors actually use the Doppler effect or if it’s some kind of interference effect. But either way, they work really well.
The nice thing about these modules is that they are pretty much a drop-in replacement for the PIR module. It can take 4V to 28V on its VIN pin and it also has a 3.3V compatible output. There’s even a 3.3V regulated supply that you can use to power other low-current devices.
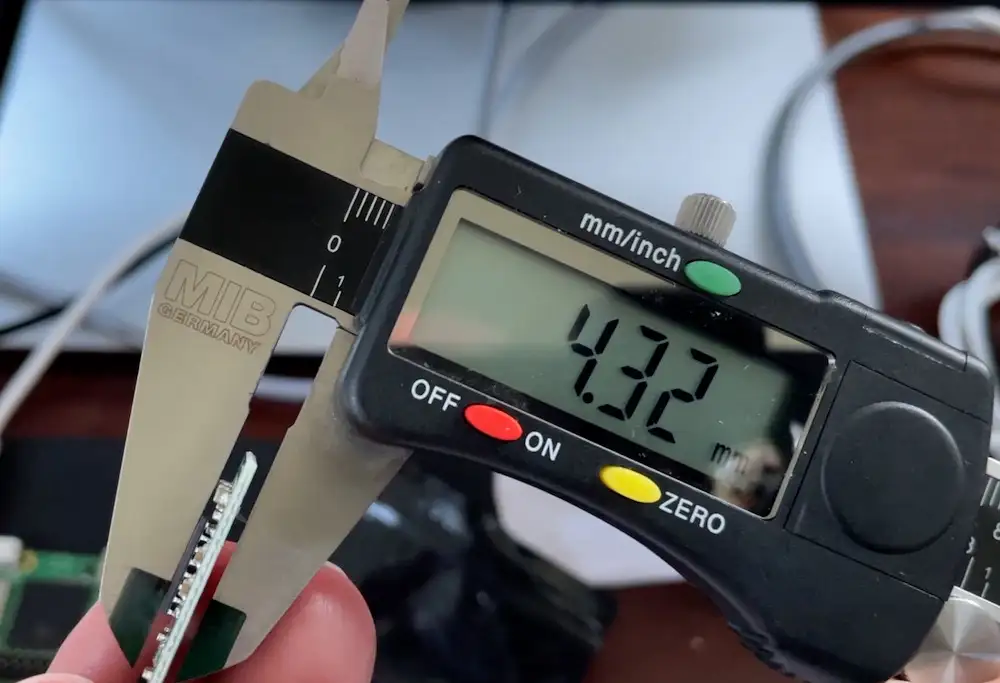
The other really nice thing is that it’s super slim, so it will fit behind the mirror quite nicely.
These are really very clever devices. They use a PCB antenna to send out microwaves at around 3.18GHz and it measures the radiation that is reflected back.
They are also dead cheap - on AliExpress you can get them for just over 20 pence each. That is less than half the price of a PIR sensor.
There are much more sophisticated Doppler radar sensors but they tend to be more expensive - but definitely worth looking into.
The module I have works really well, even when it’s behind the mirror - I was a bit worried that the half-silvered mirror would block the microwaves but it doesn’t seem to be a problem.
If anything it might be too good - we may get a lot of false positives from people moving around in the rest of the house.
This is a problem, we really only want to power things up if there’s someone in front of the mirror.
What about the Pi’s Camera?
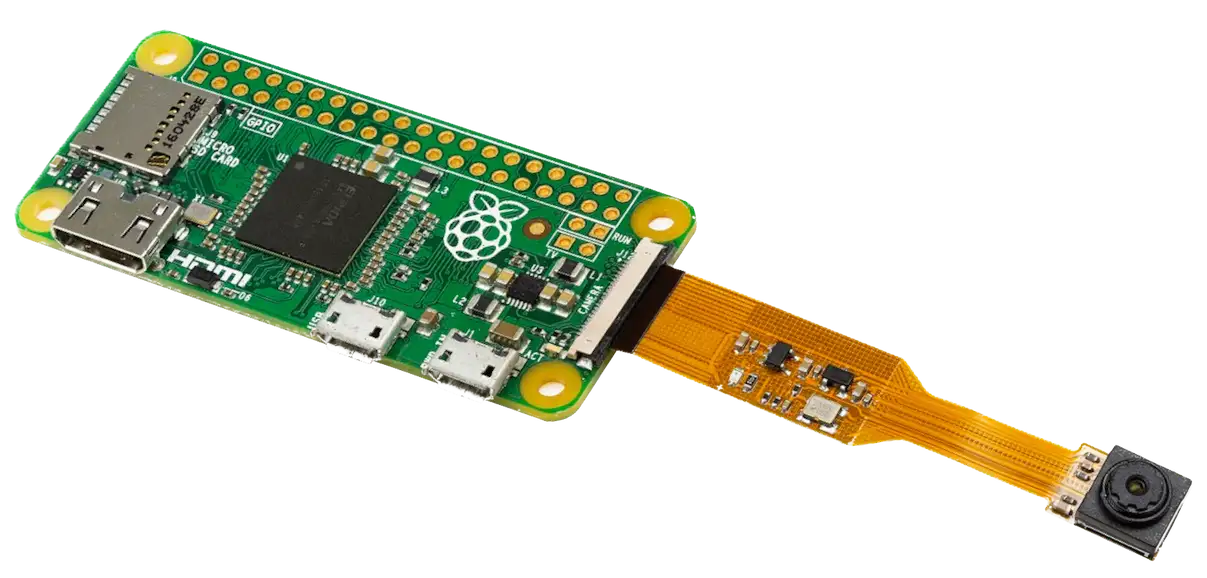
So, let’s get a bit more sophisticated - how about using a camera attached to the Pi?
This gives us some interesting options, we can use the camera to detect motion, and if we get clever we can actually detect if someone is looking at the mirror. As a stretch goal, we can even potentially recognise who the person is!
Motion Detection Using the Camera
Let’s cover the motion detection option first. This is actually trivial to do with a camera.
All you need to do is compare the latest frame from the camera with the previous frame and see if they are different.
The easiest way to do this is to take the absolute difference between each frame, you can then threshold this to remove any noise. And it’s then just a case of counting how many pixels have changed.
If there’s a lot of changed pixels then there must be movement in front of the camera. It’s dead simple. And it works pretty well. Here I am moving around in front of the Pi.

Face Detection
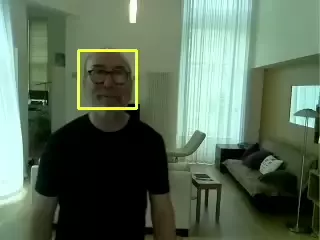
What about face detection? For this, we have OpenCV - which runs pretty well on the pi zero.
They have a Haar Cascade classifier already trained for detecting faces so we just need to download it. The code is really simple and is just a few lines. It’s surprisingly fast and only takes about 50 to 100ms per frame. That’s pretty amazing. Not bad for a Pi Zero 2.
Face Recognition
So, that’s face detection, but what about our stretch goal of face recognition? Mirror mirror on the wall, who am I?
Well, I found another Python library - aptly named “face_recognition”. This is built on top of the really cool dlib library. The dlib library has state-of-the-art face recognition built-in.
So not only can we detect a face, we should be able to identify who the face belongs to. That’s magic!
All you need to do is provide the code with pictures of each face you want to recognise. It detects the location of the face and then matches the detected face against the known faces.

The only downside is that this library is quite a bit slower than OpenCV and takes around 0.85 seconds to run the face detection code.
If there is a face in the frame then it takes an additional 0.7 seconds to do the face recognition.
So it feels like we can get the best of both worlds by combining the two together. We’ll use the OpenCV face detection code and then use this other library for doing face recognition.
Have We Just Made Things Worse?
The only problem with all this clever stuff is that running the camera and doing image processing is pretty intensive and maxes out the CPU.
When the Pi is idling along doing nothing then it draws around 100mA. If we run the camera and motion detection code this goes up to over 200mA. When we’re running the face detection code it goes up to over 300mA.
This kind of goes against our original goal of trying to reduce power consumption.
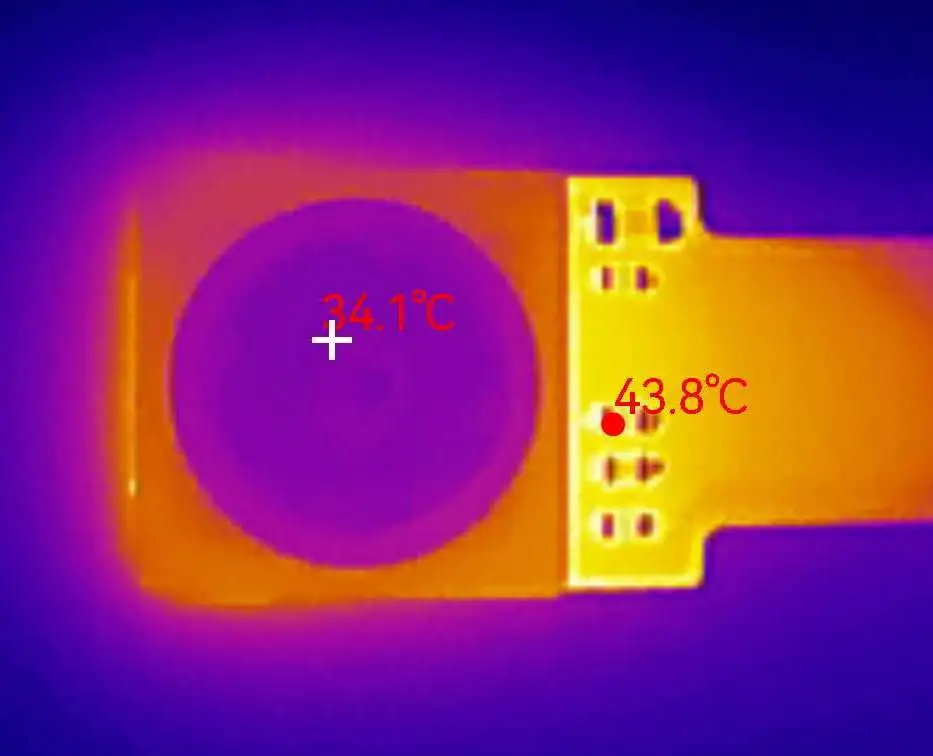
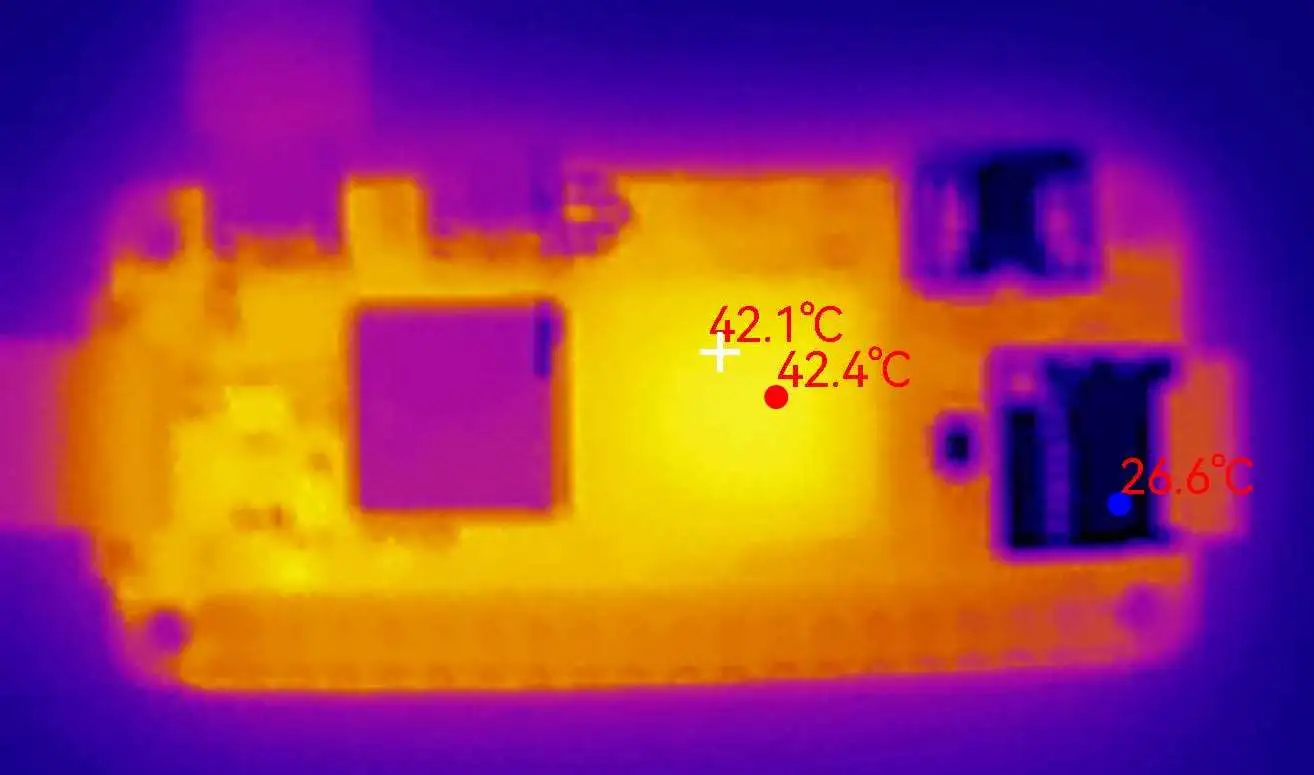
The Pi and camera also start to get quite warm when we run them continuously. We can see this by looking at it with my infrared camera - I have to say, I absolutely love this gadget. It was quite expensive, but it’s now one of my favourite toys.
Combining Everything Together
So, what I’ve done is combine everything together is an awesome package. We’ll use the Radar detector to see if anyone is near the mirror. If there is then we’ll use the camera to see if there’s motion in front of the mirror and then we’ll use the OpenCV face detection code - we’ll only power on the screen if there’s a face present.
We’ll kick off face recognition as a background job to see who the person is - we want to have anonymous access to the mirror so we can show it off to any visitors.
I’ll use this very simple state machine to control all this.
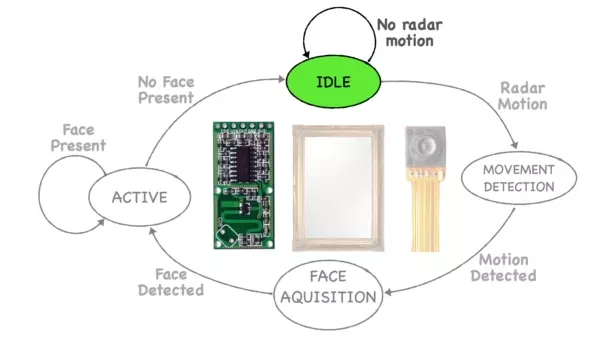
We start off in IDLE mode, waiting for the radar detector to fire. We can do this in a very power-efficient way using interrupts.
When the motion sensor fires, we’ll switch into MOVEMENT_DETECTION mode - this will run the camera along with our simple motion detection algorithm. If there’s movement then we’ll switch into FACE_AQUISITION mode. This will run the OpenCV face detection code at full speed.
If we detect a face, we’ll switch to ACTIVE mode. This will power on the screen and try and recognise who the face belongs to. We’ll then just grab a frame every second and use the OpenCV code to make sure there’s still someone looking at the mirror.
If we don’t see a face for more than 5 seconds and the motion detector says there’s no motion, we’ll power off the screen and drop back into IDLE mode.
No Plan Survives Contact With The Enemy
So, does it actually work? Well, as with most things, the answer is a qualified yes.
You can see from the logs here, that it does, we detect motion with the radar sensor. That motion gets confirmed by the camera and we detect a face. Even more importantly, we actually recognise the face!
That’s pretty amazing - it works!
When we walk away, the screen eventually turns off.
Are we actually saving any power?
I’ve hooked up my USB power meter again.
When we are in idle mode we use just around 150mA.
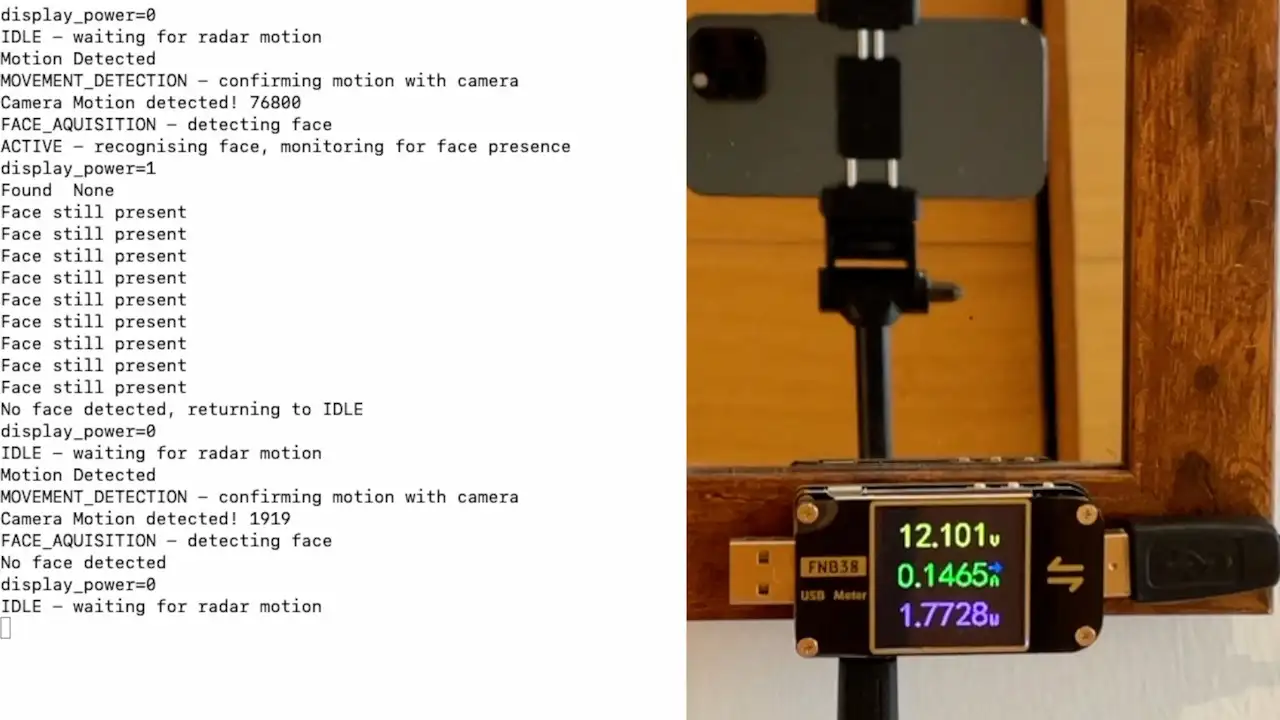
When we switch the camera on and start image processing we go up to about 350mA.

And then when the screen powers up we hit around 700mA.

When we drop back into IDLE mode the current consumption goes down to about 400mA and then the screen briefly wakes up and then goes into standby mode. Once the screen is in standby mode we drop back down to the 150mA level.
So that’s pretty good, we were using around 600mA all the time, and now we’re only using 150mA unless someone actually looks at the mirror.
So we running at about 25% of the original power consumption. Not bad at all!
What are the problems?
But as I said, it’s a qualified yes. There are some issues.
The camera is behind the half-silvered mirror, so a lot of light is being blocked. The image processing all works on a bright day, but it struggles quite a bit at night time even with the lights turned on.
We could install a motion-activated light, or we could use infrared LEDs to illuminate the face and use a camera with no IR filter.
But this seems a bit over the top.
There’s also an issue with how long the screen takes to turn on. It takes 1 to 2 seconds for the screen to wake up from standby mode. This is pretty quick, but it is noticeable.
At the moment, my feeling is the full system is not quite ready for production, so I’m just going to use the motion sensor.
All in all though, a pretty interesting project. Just needs a bit more research!
The bits
These are all affiliate links - if you buy something you pay the same price but I get a small commission which will help me to buy more stuff to write about.
You can buy my Infrared camera here: Aliexpress.
You can pick up the Doppler Radar Motion Detector here: Aliexpress (shop around for the cheapest price!) and Amazon
And if you want to stick with the PIR sensors: Aliexpress and Amazon
The nice USB power meter is this one: Aliexpress or Amazon